Box Office Xpress Jr - Dinner Theater Seating
How do you create a dinner theatre layout?
Creating a seating layout for a dinner theater that uses tables can be easily accomplished.
The program lays out seating in a grid format. Think of a piece of grid paper
that is 30 squares across and 20 squares deep.
The next step is to ask yourself how you want the tables represented. For a
table of 4, do you just want 4 squares (seats) stacked 2 on 2 ... Or, would you
prefer to have a square visually represent a table and have a square above,
below, left and right, to represent the 4 seats.
In either of the above 2 scenarios, you color in the squares that represent
seats. And then you make sure to leave all the squares touching those seats
alone. (The help system in the program explains how to create seats and make
the other squares disappear)
The screen shots below shows how this appears within the program, using both scenarios. Of course, you are not restricted to the methods suggested, as there are other possible ways to create a table of 4. And, if you have larger or smaller tables, you can improvise as you see fit.
The final step when designing the layout is to individually name each seat. The recommended method is to use a letter to represent the table, and then number each seat. For example, the table in the lower left may be table 'A'. So the seats will be numbered "A 1", "A 2", "A 3", "A 4" ... making sure there is a space between the letter and the number. Or, you can do the opposite if the table is identified by a number and the seats by letter. So, how you actually choose to identify the seats is up to you, within the guidelines of the program (maximum of 6 characters, plus a space). Note that you will likely disregard the aisle and row numbers, as these are simply necessary as part of the design process (more on that in the program's Help System).
Lastly, if your seating layout does not fit onto a single 35x25 grid, you can simply create more grids (as many as you need). You can then identify each grid (section) to make it easy to sell tickets against. For example, "Left House" or "Right Front House", or "A", or whatever is appropriate for your situation.
It is worth mentioning that the actual appearance of the tables, and your general layout, does not need to accurately reflect how they are positioned on the floor. Remember that the customer will not be seeing this layout. It is just intended for the person selling the tickets. All that is important is that the user be able to easily assign the appropriate seats. In other words, the 2 on 2 method (for 4 seats) may be the most practical, considering they take up less room on the grid.
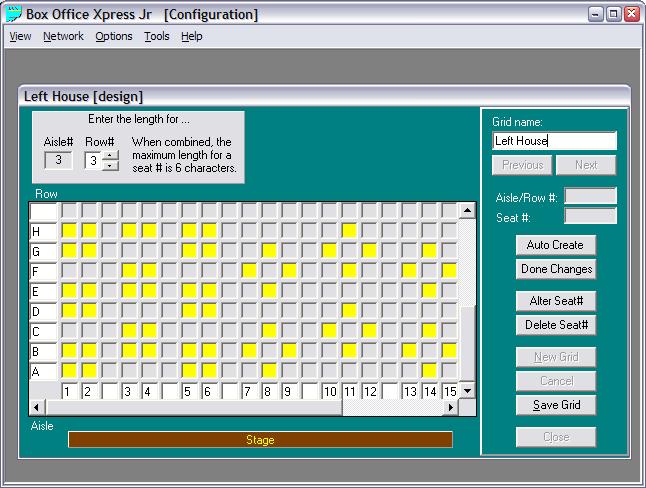
Creating the Seating Grid:
Note that the entire section is not entirely visible, but can be
scrolled into view.
This example is based on the previous version of Box Office Xpress Junior.
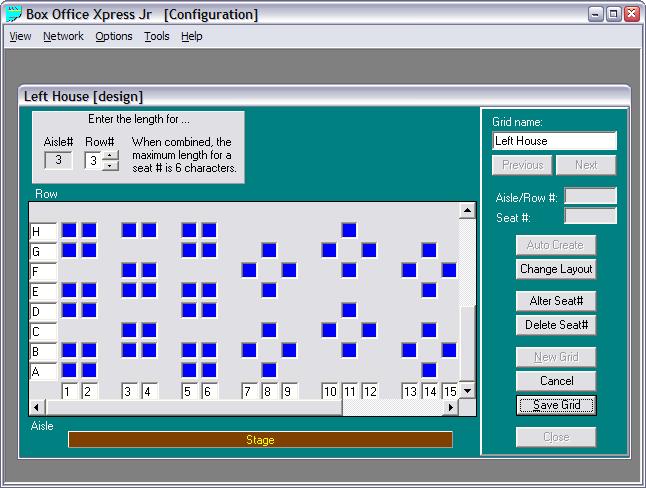
The Final Appearance (in Design Mode):
Reminder that this is illustrating 2 different types of configurations.
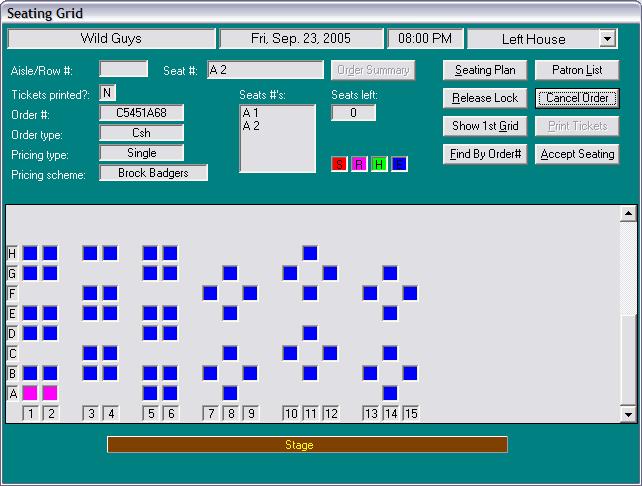
The Appearance (during the sales process):
Note that the full span across is visible (no need to scroll horizontally).